
Posted on
October 29, 2026
Inflatable Door Seal Losing Pressure: A Diagnostic Sequence From Air Supply to Splice
A step-by-step diagnostic sequence for finding why a rail inflatable door seal loses pressure, starting at the air supply and ending at the seal splice.
A door seal that will not hold pressure is one of the most common inflatable seal complaints, and one of the most commonly misdiagnosed. The instinct is to replace the tube. The better approach is to work from the air supply toward the seal, eliminating each part of the circuit in turn. Most of the time the leak is found well before the rubber.
This guide gives a practical order of work. It starts with the symptom, moves through each part of the pneumatic control circuit, explains how to run a leak-down test and ends with what to record so the next fault is easier to find. If you are new to how these seals work, our explainer on what an inflatable seal is and how it works is a useful starting point.
Start With the Symptom, Not the Part
Before touching anything, establish exactly what is happening:
- Does the seal fail to inflate at all, inflate slowly, or inflate and then lose pressure?
- Is the loss immediate or gradual over minutes or hours?
- Does it affect one door, several doors, or a whole vehicle?
- Did it start suddenly, after a wash, after a cold night, or after maintenance?
Each answer removes some possibilities. A seal that never inflates points toward supply, valves or a blocked line. A seal that inflates and then sags points toward a leak somewhere between the inflate valve and the tube. A fault that began after maintenance often has a simple cause, such as a fitting that was not tightened or a line that was refitted incorrectly.
📌 Note: Log the vehicle number, door position and date before you touch anything, so the symptom can be compared across doors later.
Read the Pattern Across Doors
How many doors show the problem is one of the fastest clues you have. A single door points to that door's circuit or seal. Several doors on the same vehicle point to a shared supply, regulator or filter. A fleet-wide trend points to air quality, a software change or a weather effect.
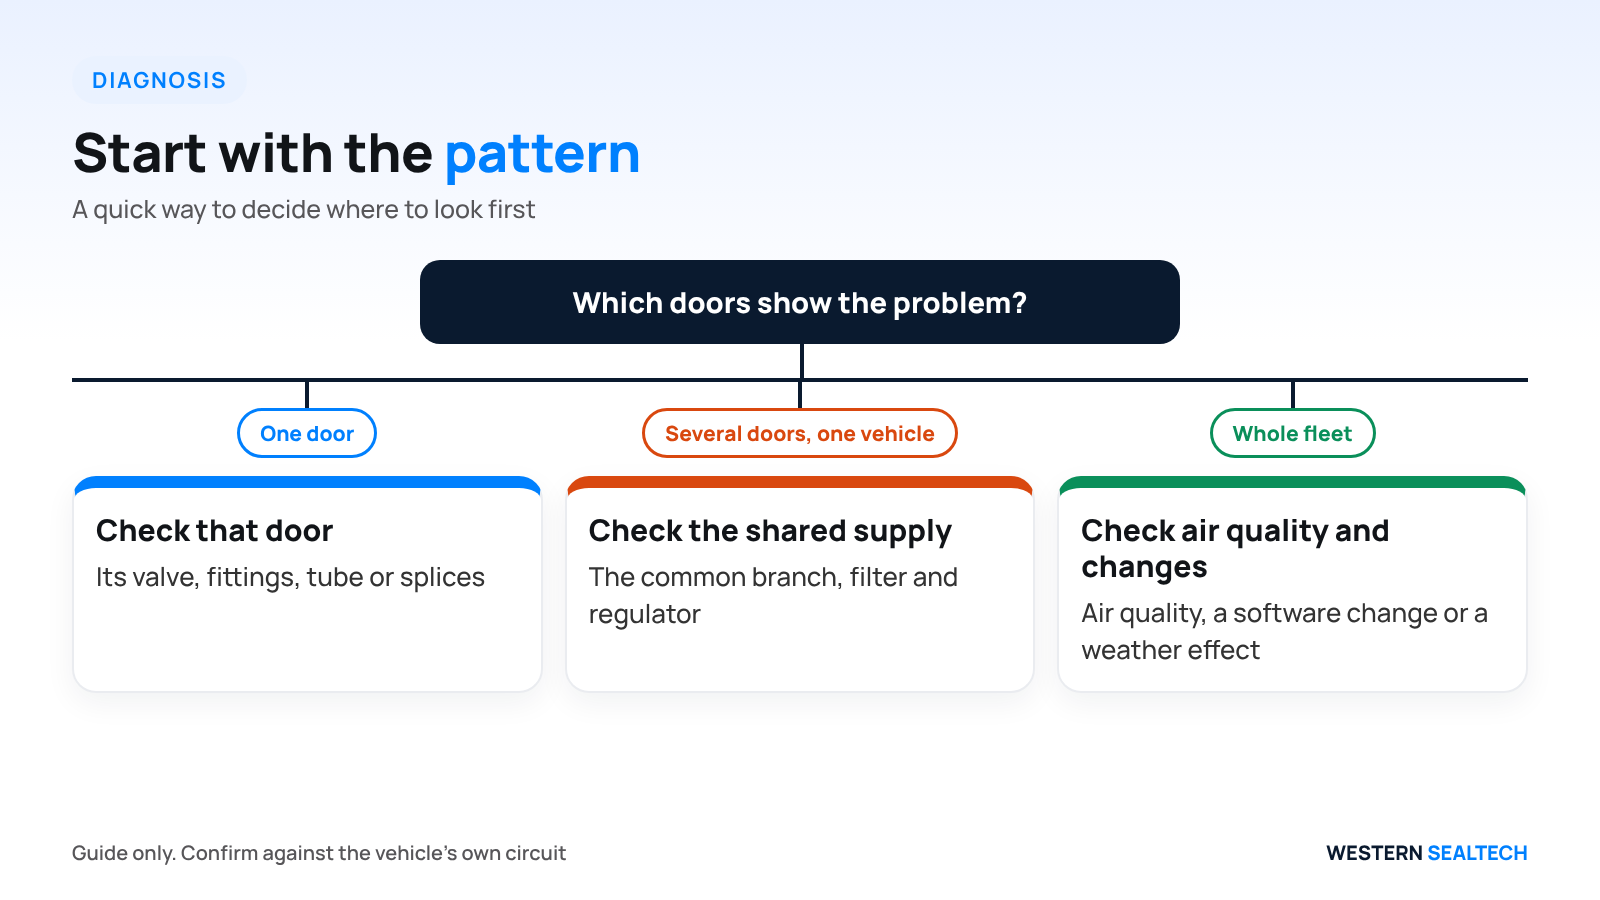
The figure is a guide, not a rule. A seal that fails on one door can still have a cause that is common to the vehicle, so use the pattern to decide where to look first, then confirm with a reading. Our article on why inflatable seals fail early looks at the engineering data behind many of these causes.
Before You Start Testing
A few preparation steps save time and keep the work safe:
- Follow the depot's own isolation and lock-out procedure, and make sure the door cannot move while you work on it
- Release stored air in the door circuit before you open any fitting
- Have a calibrated gauge or logger, a mild soap solution and, if available, an ultrasonic leak detector ready
- Keep the vehicle's circuit diagram to hand, so valve and sensor positions are not guessed
- Note the current pressure setting before you change anything
⚠️ Watch out: Never open a pressurised line to find a leak. Isolate and vent the circuit first, then pressurise it again under control for the test.
The Diagnostic Sequence
The sequence below works from the supply toward the seal, so every check also rules out the parts upstream of it. It follows the same logic described in our guide to inflatable seal failure modes, where each failure leaves a recognisable signature.
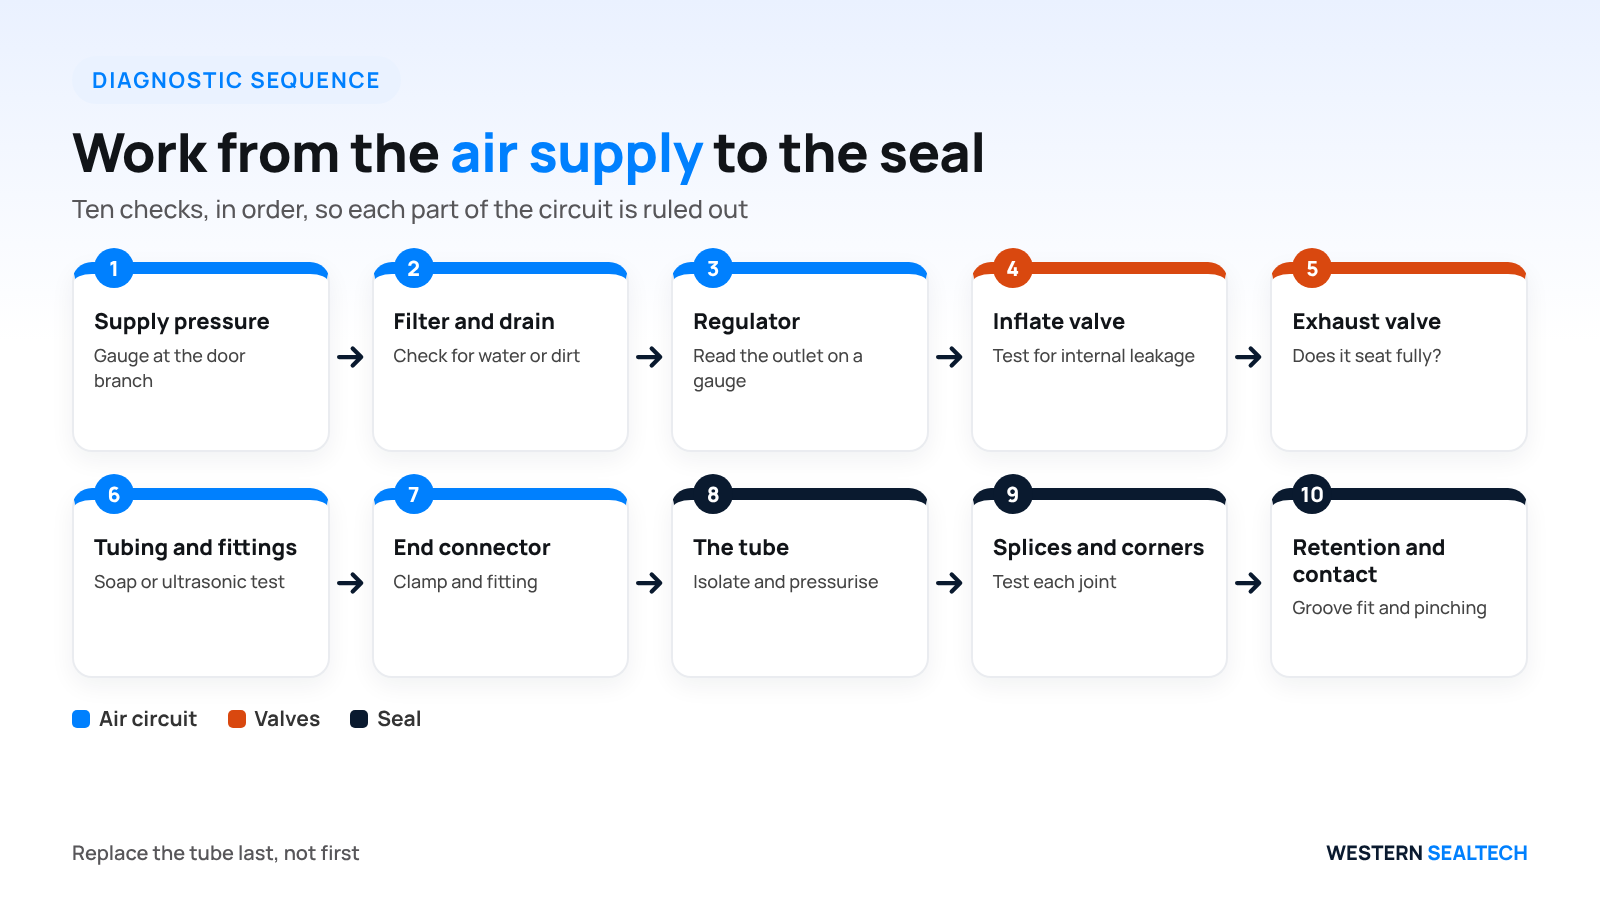
| Step | What to Check | Method | What the Finding Means |
|---|---|---|---|
| 1 | Vehicle air supply pressure at the door branch | Gauge at the supply point | Low supply means a vehicle-level or compressor issue, not a seal issue |
| 2 | Filter and drain | Visual check, drain, replace element | Water or contamination in the line points to air quality as the root cause |
| 3 | Regulator output | Gauge on the outlet while the system is closed | Output below setting or drifting suggests a regulator fault |
| 4 | Inflate valve | Listen and test for internal leakage with the seal isolated | A leaking valve bleeds air steadily into or out of the circuit |
| 5 | Exhaust valve | Check that it seats fully when closed | A valve that does not seat vents the seal slowly |
| 6 | Tubing and fittings | Soap solution or ultrasonic leak detector along the whole run | Bubbles or hiss at joints, chafe points or kinks |
| 7 | End connector at the seal | Same test at the clamp and fitting | Loose clamp or cracked termination |
| 8 | The tube | Isolate, pressurise, and test the full length including wall | Pinholes, cracks, blisters or delamination |
| 9 | Splices and corners | Test each joint and each corner closely | Joint leaks, often at corners where stress is highest |
| 10 | Retention and door contact | Inspect groove fit and contact line | Seal pinched, cut or pulled during door movement |
💡 Tip: Change one thing at a time and re-test after each change. If you replace the regulator and a fitting together, you will not know which one fixed the fault.
How to Run a Leak-Down Test
Close the inflate valve, isolate the seal from the supply, and log the pressure over a fixed period with a gauge or logger. Compare the decay rate with the acceptable leak rate for the system. Then repeat with the seal disconnected and the circuit capped. If the circuit alone holds pressure and the seal does not, the leak is in the seal. If the circuit alone loses pressure, the fault is upstream. This single comparison removes half of the possible causes in a few minutes.
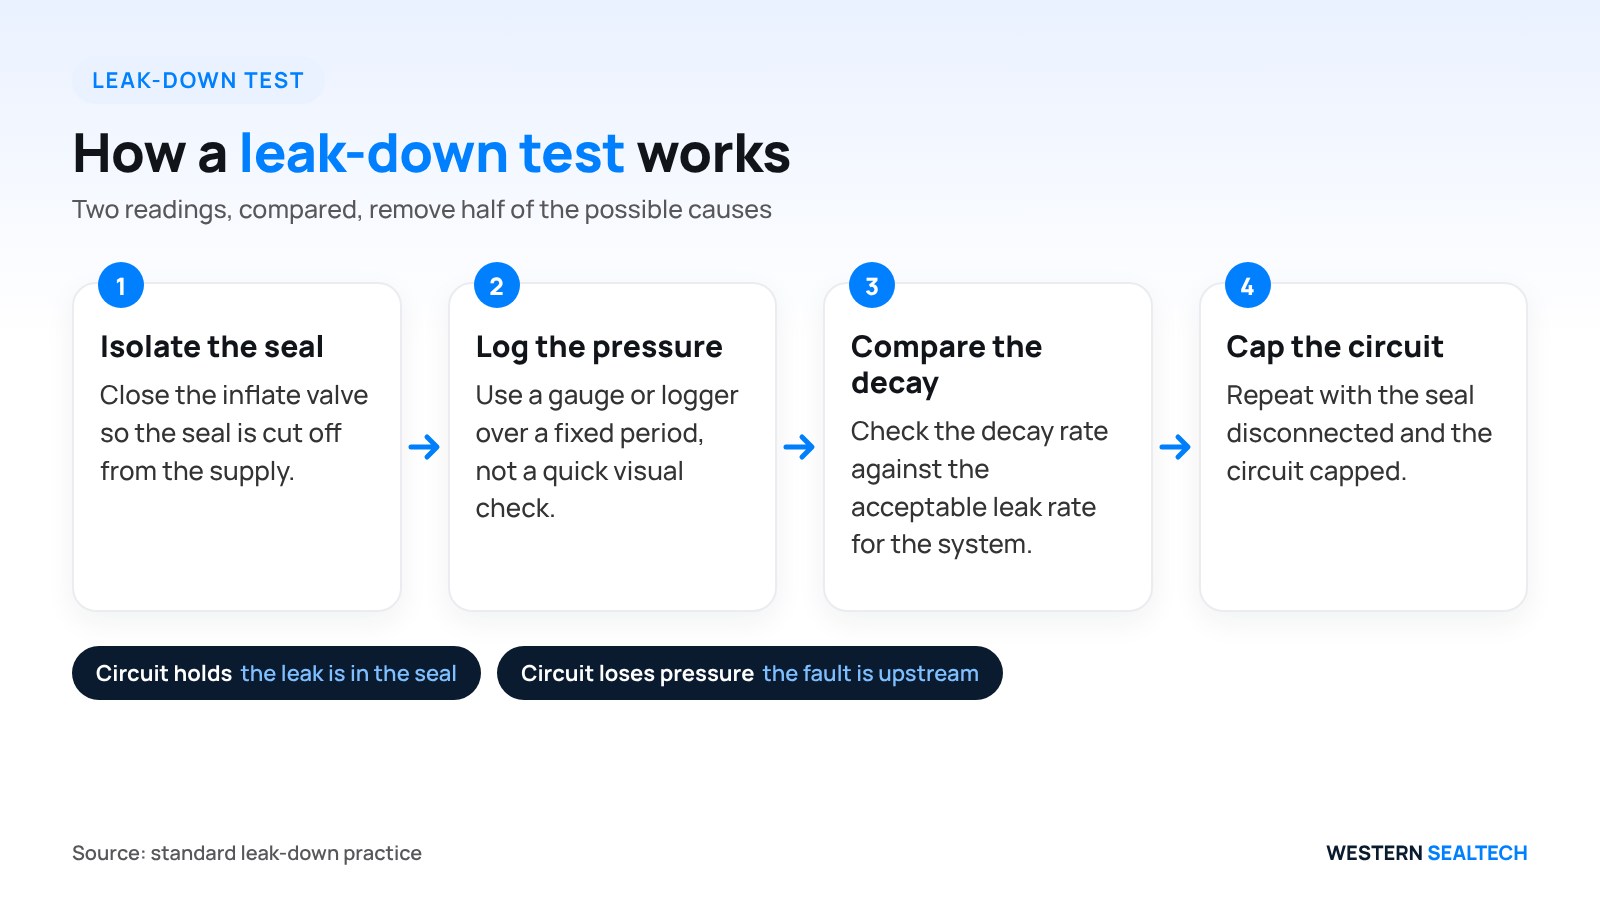
Keep the test conditions the same each time: the same starting pressure, the same time period and, where practical, the same temperature. Pressure changes with temperature, so a seal tested warm and then cold can appear to lose pressure without any leak at all. Sizing and pressure settings also matter, and our guides on sizing a seal for door gap, stroke and pressure and the five pressure mistakes that cause bursts explain how a wrong setting can look like a leak.
💡 Tip: Use a gauge or logger over a fixed period rather than a quick visual check, so the decay rate can be compared with the acceptable leak rate.
Tools That Help
- Calibrated gauge or data logger. A logger shows the shape of the decay, which a one-off reading cannot
- Soap solution. Cheap and effective for fittings, connectors and joints you can see
- Ultrasonic leak detector. Useful where a leak is hard to reach or noise masks the hiss
- Cap and plug set. Needed to isolate sections of the circuit for the leak-down comparison
- Torque tool. Fittings and clamps should be tightened to the specified value, not by feel
Where Leaks Are Usually Found
The list below is a set of common places to look, not a ranking by frequency.
- At fittings and connectors, especially after vibration or thermal cycling
- At the end termination, where tube and connector meet
- At splices and corners, where the wall is under the most stress
- At pinholes caused by debris, abrasion or cuts
- In valves that have worn or collected contamination
Splices and corners deserve extra attention on seals that were formed in the frame. Corner geometry and joint quality are covered in our product page on spliced and vulcanised seals, and the choice of profile also affects how a seal behaves at corners, as explained in our guide to inflatable seal profiles for rail doors.
When the Seal Itself Is the Cause
If the seal fails the isolated test, remove it and inspect it in a good light. Look for cracking at fold lines, blisters in the wall, cuts, joint opening and signs of heat or chemical damage. Compare the evidence with the failure modes in our guide to inflatable seal failures. The cause shown on the seal tells you whether a like-for-like replacement will last, or whether the specification must change.
Surface cracking suggests an ageing problem, which is covered in our article on ozone, ageing and UV testing. Blistering or bulging suggests a problem between the rubber and its reinforcement, and our comparison of fabric-reinforced and non-reinforced inflatable seals explains why that bond matters. If the seal is the right one but the wrong compound for the duty, our guide to compound selection for rail inflatable seals is the next step.
⚠️ Watch out: Do not replace the tube first. A like-for-like replacement will fail again if the cause is a regulator, valve or fitting upstream.
Checking the Result After a Repair
A repair is not finished until it has been proved. After any change, repeat the leak-down test with the same conditions and compare the new decay rate with the one you recorded before. Then cycle the door several times and re-check, because some faults only appear under movement. If the vehicle is returned to service, keep an eye on the same door at its next inspection.
✅ Quick win: Keep the removed part, labelled with the door position and date, until the repair has held through a few days of service. If the fault returns, the evidence is still available.
What to Record
Note the vehicle number, door position, date, symptom, readings at each step and the part that was replaced. Over time, this record shows whether failures are random or clustered on one door position, one supplier lot or one maintenance event.

A consistent record also helps when you need support from a supplier. Photographs, readings and the symptom history let an engineer review the case without guessing. For fleets that run both types, our comparison of inflatable and static door seals explains how the diagnostic effort differs, and our overview of inflatable seals and of fire-safe sealing for rail and mass transit shows what we supply for these applications.
Key Takeaways
A door seal that loses pressure should be diagnosed from the air supply toward the seal. Start with the symptom and the pattern across doors, then work through supply pressure, filter, regulator, valves, tubing, connector, tube, splices and retention. A leak-down test on the seal and on the capped circuit separately shows whether the fault is upstream or in the rubber. Prove the repair with a second test, and keep a record of readings so you can spot patterns by door position or lot.
Need help diagnosing an inflatable seal that will not hold pressure? Send us the symptoms and readings and our engineers will help.
Need a custom sealing solution?
Talk to our engineers about inflatable seals, rubber diaphragms and custom extrusions built to your exact spec. We respond within one business day.
Frequently asked questions
Why does a seal sometimes hold pressure in the depot and leak in service?
Temperature, vibration and door movement load the seal and fittings in ways a static test does not. Cold can also stiffen the tube and open small leaks.
Is a bubble test with soap solution safe for the seal?
A mild soap solution is generally acceptable, but check that it is compatible with the compound and rinse it off afterwards.
How much pressure loss is normal?
Every circuit leaks to some degree. The acceptable rate should be defined in the system specification, and pressure loss beyond that figure should be investigated.
Should the seal be replaced as the first step?
No. Replacing the tube without checking the circuit often leads to the same fault returning, and wastes time and parts.
Can fleet-wide pressure loss be caused by the seals?
It is possible, but fleet-wide trends are more often caused by air quality, regulator settings, software changes or seasonal effects than by a defect in every seal.
Can temperature make a healthy seal look as if it is leaking?
Yes. Pressure in a closed circuit changes with temperature, so a seal tested warm and re-tested cold can show a drop without a leak. Keep test conditions the same when you compare readings.
How do I know the repair has worked?
Repeat the same leak-down test after the repair, cycle the door several times and compare the new decay rate with the earlier reading. Check the same door again at its next inspection.

Need a quote?
For custom rubber sealing solutions contact us. We will respond to you within 1 business day